Sunday, December 6, 2015

Making Algebra Fun!!!


Hey Friends,

I love to challenge myself! So when I had this idea to make an algebra activity for my Teachers Pay Teachers store, I had to run with it!

If you've read my blog, you probably can tell that most of my work has been in the field of elementary education. I got to peek out of that for one year while I was teaching English as a Second Language to students at all grade levels. I was scared when I started, but I loved that job!

Back to my idea...

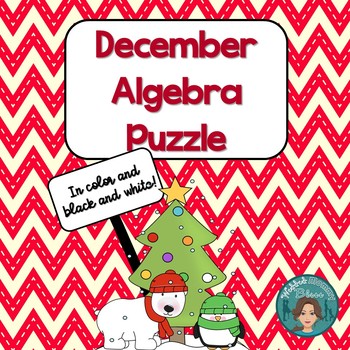
I wanted to make a fun algebra puzzle that was something that a teacher might use the day before a holiday vacation or maybe on a snow day that turned into a half day. However it worked out, I wanted this to be something that would be different than sitting and taking notes, but also allow students to get some practice in solving algebra problems.

The resulting puzzle was my "Thanksgiving Algebra Puzzle" which seemed to sell pretty well in my store. I decided to run with the idea and also made "Christmas Algebra Puzzle" which is now available in my store. If you're curious as to what these puzzles really look like, you can download my FREE Hanukkah puzzle. The Hanukkah puzzle turned out to be about half the size of my normal puzzles, so I decided to make it a freebie.

I have not received much feedback yet on these puzzles, so if you download them from my store and use them in your classroom, I would LOVE LOVE LOVE to hear how it goes! Also, I am already working on a Snow/January Puzzle, so expect that there will be more to come!

Wednesday, November 11, 2015

Graditude!

I love this time of year! There are so many wonderfully fun things going on! Are you remembering to give back to others?

I saw a funny cartoon the other day. It said, "Black Friday. The day when everyone nearly kills each other for cheap stuff, just the day after being thankful for all that they have!" That made me chuckle and also really consider the things that we do during this season. Are you remembering to show gratitude?

Thanksgiving is just about two weeks away. We are plugging along with our Thanksgiving Turkey of Thankfulness.

We are also working on a Gingerbread house which we make as a family and then drive downtown to be part of the Gingerbread display. We have been taking part in this tradition since the year that my son was born.

One year, I made a Turkey cake and delivered it to local firefighters and policemen in our town.

We will also be filling shoeboxes next week for Samaritan's Purse. We have also done this for a couple of years now.

It is so important to me that my children learn to give. What are some ways that you are showing people that you love, care, and appreciate them this season?

Friday, November 6, 2015

Roll it, Read it!

I created this last year for Matthew. He was really starting to take an interest in reading and writing, so we abandoned the short vowels and skipped ahead to "The H Brothers". These are the words that start with ch-, sh-, th-, and wh- and there's an awesome story that helps bring this to life (google it!).

The game has minimal prep.
~I prefer to laminate our board. You will need one per person.
~You will also need to prepare one die for each pair or group that will be playing.
~One dry erase marker per person.

In the game, you simply roll a die, whatever number you roll is the number that you read. Each number has 4 sentences, when you read one, you mark a box beside the one that you read to show that you were successful in reading it. Unless you roll a 6, then you get to choose any of the numbers and read any one sentence from anywhere on the page. The player that reads all four sentences by any one number is the winner!

Matthew loves to play this game!

This product is on my Teachers Pay Teachers store: Wedded Mommy Bliss right now! I expended it to allow for a variety of levels to use it. At the beginner level, students simply have to identify uppercase letters. As students progress is their reading, they can move through short vowel families, long vowels, and then on to reading sentences.

Thursday, November 5, 2015

Voting for Favorite Foods!!!

Do you kids like to write? Mine really does! He loves writing in notebooks about whatever is on his mind. Writing with a predetermined focus is more difficult, but it must be done!
Today, we used the voting themed writing prompt from my November Story Starters, (aka Writing Prompts) to write about Matthew's favorite food.
 Matthew has a difficult time choosing just one thing that he likes most of the time. I stopped trying to force him to pick a favorite a long time ago, so I was not surprised when I asked him to draw his favorite food, there were three different foods: candy, waffles, and ice cream. Well, actually, I was shocked that pizza didn't make the list! We started off by drawing his favorite food and coloring it. I personally feel that it is easier to write about something when you can really visualize what you are writing about.
After he drew and colored his "Rainbow Candy". We went up to the question and finished the sentence. He thought he was getting off easy, because he just wrote "Rainbow Candy" and assumed he was done. I told him that he had to also add a reason for why he liked Rainbow Candy the most. He said "Because I like rainbows." After he finished, we did some editing. We talked about "rainbow" being a compound word, any time "I" is used as a word it is capital, and we talked about punctuation. Actually, he remembered to put a period at the end, so I circled it, just to let him know that I noticed it. To be "age appropriate" I did not throw in his face that a sentence could not start with "because", instead I just pretended that it could and showed him how it would be capitalized.
I think you can expect to see more writing prompts being used at our homeschool table over the next few months!

Wednesday, November 4, 2015

We are thankful for.....

I realized this morning that it was already November 4th and I haven't put up our turkey and started added feathers!  I decided this year that I wanted to print, laminate, and use my new product!!! 
This product is called "We Are Thankful For..." and it is available in my store for $2!!! I printed out the body and about a dozen feathers.
 This is my lamination station happening right on the kitchen counter! I love watching this thing work! It's great to laminate things like this, because I know that my family will continue to use them. It is very important to me that my children grow to understand gratitude.
After I laminated and cut out the body and feathers, I asked my son what he was thankful for. He said, "this whole family! I wouldn't be alive without them!" That's just so sweet! All through the month, this turkey will continue to get new feathers with things that my children are thankful for. I love, love, love watching the turkey get all of his feathers! I hope you enjoy it too!

Monday, November 2, 2015

Planning Playtime

I had the pleasure of reviewing an awesome product today!

Today I downloaded "1st Grade Math and Literacy Bundle - November" from Amy who owns "Planning Playtime" on Teachers Pay Teachers. Basically, Amy just asked me for some feedback on her product, but I liked it so much that I wanted to share it with you. 

This bundle has 23 pages to it and they are beautifully done! The math pages include: single digit addition, subtraction, more and less (fill in a number that is 1 more than the one given and then also l less), addition word problems, an addition dice game, counting by 2s and 5s, odd and even, and recognizing numbers in word form. The literacy pages include: word practice, reading sentences to determine if they are true or false, beginning sounds, word family discrimination, color by word family, and three writing prompts related to Thanksgiving.

My excitement for these pages led me to immediately print them and get my son to work on some schooling for the day. 

 This is Matthew working on the counting by 5s page. I liked that there were a few written in so that he did not get too lost when counting by 5s. His number writing still is not that great, so it really takes him some time to think about what he has to do to make each of the numbers. Halfway through, I thought it would be best to write the numbers 1-9 at the top of the page just so that he could focus his attention on the task that was intended and not so much on trying to recall the formation of numbers.
This addition sheet was nice as well. He counted the different pictures to determine the addends and then wrote the sums. You can see on this page where I wrote the numbers again. This practice was much needed!

Amy has many more wonderful products for students in PreK-5th grade, so please click over and check her store out!

 Planning Playtime

The during and after....

You asked, and I was listening! I finally got all of these pictures together to show you how things turned out in our kitchen! Enjoy!
 
These are the rooms that we started with. A small kitchen and a playroom that I had already removed most of the toys from.
 
Then we demoed one side at a time. You can see....we were all the way down to the old original bare walls.
 
This floors has always been a bit of a disaster. This section of the house used to be a sunroom or something so the way that the floor was put in was kind of a mess. We decided to fix that as much as we could while we were tearing it all up.
We also tore down the wall between the rooms so that it could all be one big kitchen.
 
The day that drywall went up and the dust was back down to a minimum, that's when we started to feel like there might be an end to all of this craziness!
 
Here's the wall color on the walls and the cabinets before they were painted.
 
Then appliances got here! And things really started to look finished! BUT the plumbing wasn't set up yet so we still had waiting!
 All finished! Everyone loves this room, so you'll notice that my daughter was loading up her toys on the floor


This is my favorite spot!! I love to be here!

And here's the man that I can thank for heading up this project! Thanks Dad! You deserve all of the kisses and hugs for this one!

Sunday, November 1, 2015

Road to Speech

I've been on a journey lately, trying out a new way to share my teaching resources through my Teachers Pay Teachers store. While working to make connections with other sellers, I joined a group of newbie teacher authors on Facebook. Our goal is to help support each other and share knowledge. One of the ways that we are encouraging and supporting each other, is taking one day a week to review and make suggestions for another teacher author in our group.

This week, I am learning a bit about Speech Therapy while visiting the store: Road to Speech. The owner of this store, Marisha, has a Master's of Speech Language Pathology from the University of Washington. Marisha's store, includes Speech materials for grades PreK-6. There are articulation stickers, visuals for teaching grammar, themed sticker activities, and so much more.

After my visit to the store, I decided to check out the Road to Speech blog. What I loved about the blog was that it showed the products from the store in use! This post caught my eye, because I had just downloaded the product that was used in the picture of her last blog post. The product was for goal setting, which is a skill that I practice with my own children at home, because I feel that it is so important.

I hope that you will take minute to two to visit the Road to Speech store and blog. When you do, please share a comment about what you found to be helpful!


Wednesday, October 28, 2015

New products on Teachers Pay Teachers

Hi Friends!

I have been working so hard over the past month to get my Teachers Pay Teachers store up and running. I have posted over 20 products in about 28 days! I can't even believe it!

I would love for you to check out my store and give suggestions on what you like, don't like, want to see, or need to have.

I have loaded a few freebies in my store. Please enjoy!

Friday, October 9, 2015

Another new adventure....

I used to be a classroom teacher.

I wanted to be a teacher since as early as I can remember.

I adored my teachers!

Now, I'm a mom and a homeschool mom at that! I wear many different hats, but about a week ago, I put on a new one....

BUSINESS WOMAN!

I decided to open up a Teacher Pay Teachers store. The site allows teachers to post worksheets and activities that they've created so that other teachers, parents, homeschoolers, and anyone else can purchase their items.

I am only a week in and I'm very anxious to make my first sale, gain followers, and receive feedback. I would love it if you could take a few minutes to look at my store. I have a number of free products that you can download and use right now!

Wish me luck on this new adventure!!!

Sunday, February 15, 2015

Mario brothers blanket

For Christmas, I made my awesome, game loving husband a quilt. It took me almost three months, but his Mario blanket got finished! Here's just a few pictures of the process.

The most exhausting part of this quilt was cutting all of the squares. It was 15x20 squares, so that's 300 little squares. I've never attempted a quilt before, so starting out, my first thought was that I could cut everything like they did "back in the day". After about 10 squares, I gave in and bought a roller cutter. Things improved quickly!!

I took these pictures of the fabric that I bought and planned to use, because there's nothing worse than starting a project and trying to recall what was bought. I tried to gauge how much of each color that I would need by how often it was used in the quilt, but I did not do the math to figure out exactly how many yards I would need. I also may have forgot to mention that this quilt did not come with a pattern, par say. I simply found a picture on Google of a pixel Mario and followed the squares.

If I had to guess, my order probably looked like this
1/2 yard of black
1/4 yard of yellow
3/4 yard of brown
1 yard of the off white
1 yard of the dark blue
1 yard of red
2-3 yards of light blue

However, I do believe that I did need to go back out and purchase more of the light blue, so my initial order may have been more like 1-2 yards.

As I said, I cut out all of those squares and then I just started pinning and sewing rows together. It I followed my little pixel picture and checked everything multiple times to make sure I didn't sew anything out of order. After a row of squares were sewn to each other, I just added them on to the quilt (I started at the bottom and went up from there)


This picture show how Mario looked when he was all pieced together. I felt pretty awesome when I got to this point, and did not realize how much more work I still had to do to attach the batting and the back.

I used red flannel for the back and I took Mario with me to the fabric store so that I didn't have to buy any more fabric than what I needed.

Once I had the middle and back laid out, I started in the middle of Mario's red shirt and started pinning him with quilting safety pins. I pinned about 40 squares at a time and then I had to sew around each square so that all of the layer would be tied together.


This project started around October and I worked on and off through January to finish it.

After I finished this one, I realized that I was going to be hooked on quilting! So, I bought some material to make a few baby rag quilts. Thank goodness those move along much quicker! I finished one in 2 or 3 weeks working on it very little. Perhaps you'd like to see it?